
EN |
React Native integration
Quick Guide to React Native SDK Integration.
Index
What do you need for integration?
- An account with which to access the Indigitall panel, if you have not yet created it you can create an account here .
- The next thing is to have a project associated with the application web (web browsers) and / or mobile (android, ios), if you have not yet created and configured it you can create a project in your indigitall account.
It is important since the project contains the configuration data of your application, that is, the domain where your website is hosted, the safari or iOS certificates or the firebase key that android uses. It all depends on the platforms (web or app) that the project uses.
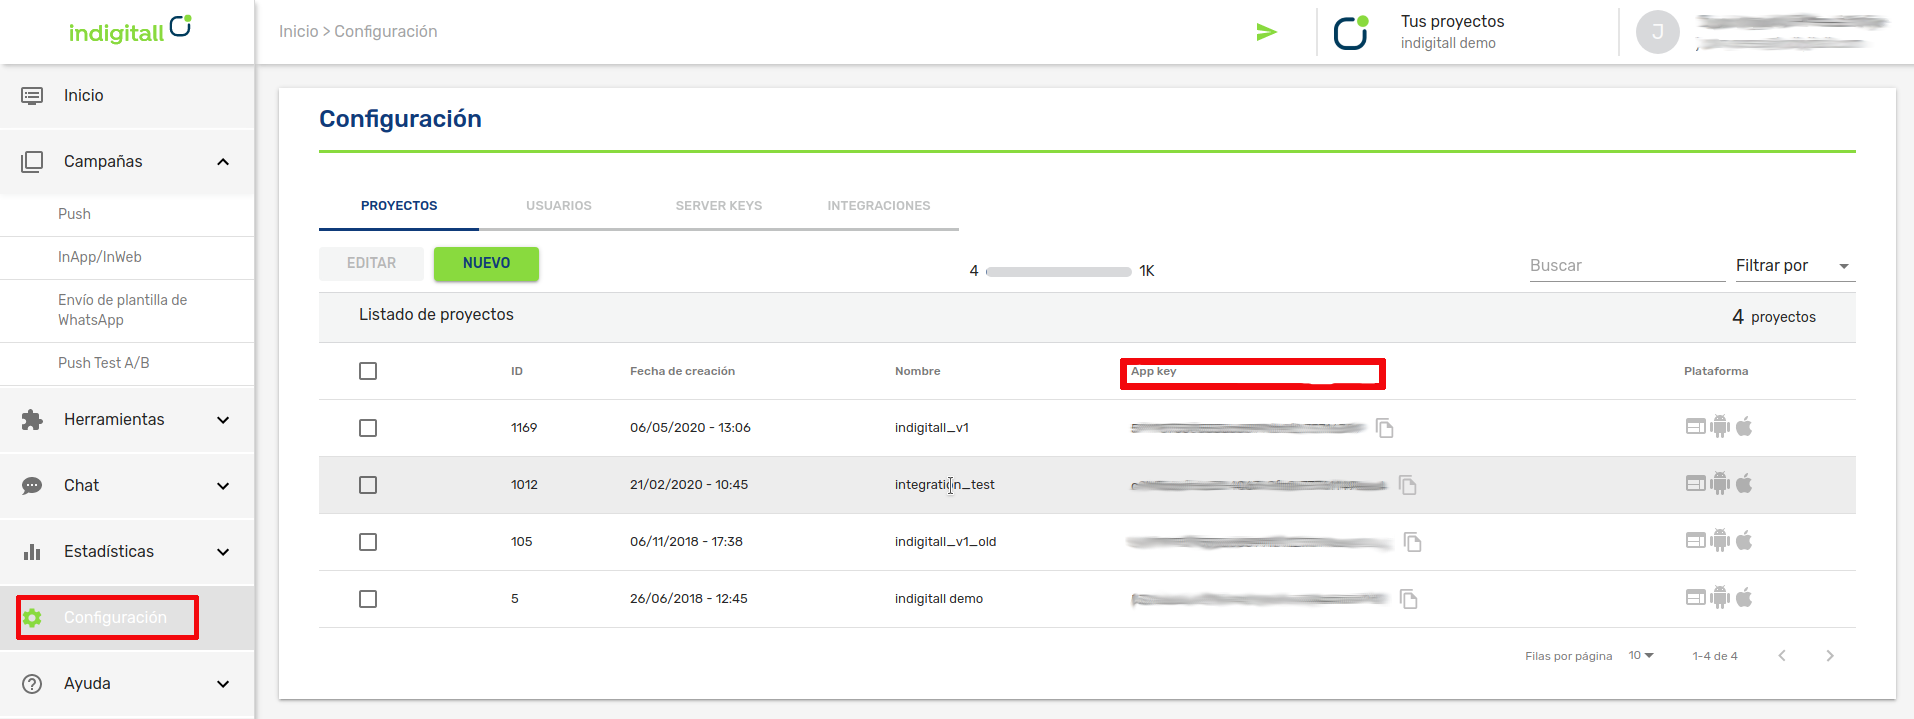
- You will need the App Key of the project, which is the key that our system uses to identify it, so it is unique for each project. You can find it in the administration console within the Configuration section in the Projects tab. You can see it in the following image, and to copy it, it is easy to click on the icon next to the key (App Key)
- For android
- A Firebase Server Key
- A HMS Push Kit Server Key
- Android Studio
- An Android device or emulator with Google Play services installed to run the app
- For iOS
- A valid push certificate for iOS. Learn how get push certificate from APNS
- Xcode
- An iOS device to run the app
Integration
This article shows the minimum development that must be done to start registering devices and being able to carry out the first push campaigns.
The Indigitall SDK is compatible with Google messaging services, through the Firebase platform and with the services of HMS or Huawei Mobile Services of Huawei.
You can see it in this tutorial video or read the instructions below:
Our SDK is available via npm .
npm (Node Package Manager) it is a package management system. It consists of a command line client and an online database of public and private packages.
Import the plugin
To import the SDK into your project, follow these steps:
- Open the console and position yourself at the root of the project.
$ cd /PATH/TO/YOUR/PROJECT- Run this line in the console to import the plugin:
$ npm install indigitall-react-native-pluginConfiguration for Android
Adding the SDK dependencies
Config the build.gradle of your project as the following example:
buildscript {
    ...
    repositories {
        ...
        maven { url "https://developer.huawei.com/repo/" }
    }
    dependencies {
        ...
        classpath("com.google.gms:google-services:4.3.+")
        classpath("com.huawei.agconnect:agcp:1.4.1.300")
    }
}

allprojects {
    repositories {
        ...
        mavenCentral()
        maven { url "https://developer.huawei.com/repo/" }

    }
}- SDK compatibility with Android is as of Android 5.0
Adding the indigitall services
These services are necessary so that our SDK can synchronize device data with indigitall's servers.
<manifest ...>
    <!-- ... -->

    <uses-permission android:name="android.permission.INTERNET" />
    <uses-permission android:name="android.permission.VIBRATE" />
    <uses-permission android:name="android.permission.WAKE_LOCK" />
    <uses-permission android:name="android.permission.RECEIVE_BOOT_COMPLETED" />

    <!-- To obtain the location of the device -->
    <uses-permission android:name="android.permission.ACCESS_FINE_LOCATION" />
    <uses-permission android:name="android.permission.ACCESS_COARSE_LOCATION" />
    <uses-permission android:name="android.permission.ACCESS_BACKGROUND_LOCATION"/>
    <application ...>
        <!-- ... -->

        <!-- MANDATORY -->

        <!-- So that when the user presses a push, the metric is saved -->
        <service android:name="com.indigitall.android.services.StatisticService"/>

        <!-- Daily sync of device data -->
        <service android:name="com.indigitall.android.services.NightService"/>

        <!-- To start services when you restart the device -->
        <receiver android:name="com.indigitall.android.receivers.BootReceiver">
            <intent-filter>
                <action android:name="android.intent.action.BOOT_COMPLETED" />
            </intent-filter>
        </receiver>

        <!-- OPTIONAL -->

        <!-- So that when the user clicks an InApp message, the metric is saved.
        It is only necessary if you use the InApp message functionality -->
        <service android:name="com.indigitall.android.inapp.services.StatisticInAppService" />

        <!-- To obtain the location of the device.
        It is only necessary if you are going to ask for location permission
        to segment pushes by device location -->
        <receiver android:name="com.indigitall.android.receivers.LocationReceiver">
            <intent-filter>
                <action android:name="LocationReceiver.Action.LOCATION_UPDATE" />
            </intent-filter>
        </receiver>

    </application>
</manifest>
Adding Firebase Services
To activate Firebase notifications you must add your google-services.json file in your android project inside your app folder and modify your build.gradle file as follows:
...
apply from: "../../node_modules/..."
apply plugin: 'com.google.gms.google-services'
Adding HMS Services
Currently, in version 1.1.0 of our SDK, HMS services have been excluded because Google prevents any apps with HMS dependencies from being deployed to the PlayStore. As soon as HMS finds a fix, we'll re-publish, and independently, so it doesn't affect this again in the future. Sorry for the inconvenience