
Integración iOS
guía rápida de integración del SDK de iOS.
Indice
¿Qué necesitas para la integración?
- Una cuenta con la que poder acceder al panel de Indigitall, si aún no la tienes creada puedes crear una cuenta aqui.
- Lo siguiente es tener un proyecto asociado a la aplicación web(navegadores web) y/o movil (android, ios), si aún no lo tienes creado y configurado puedes crear un proyecto en tu cuenta de indigitall.
Es importante ya que el proyecto contiene los datos de configuración de tu aplicación, es decir, el dominio donde esta alojada tu web, los certificados de safari o iOS o la clave de firebase que usa android. Todo depende de las plataformas (web o app) que use el proyecto.
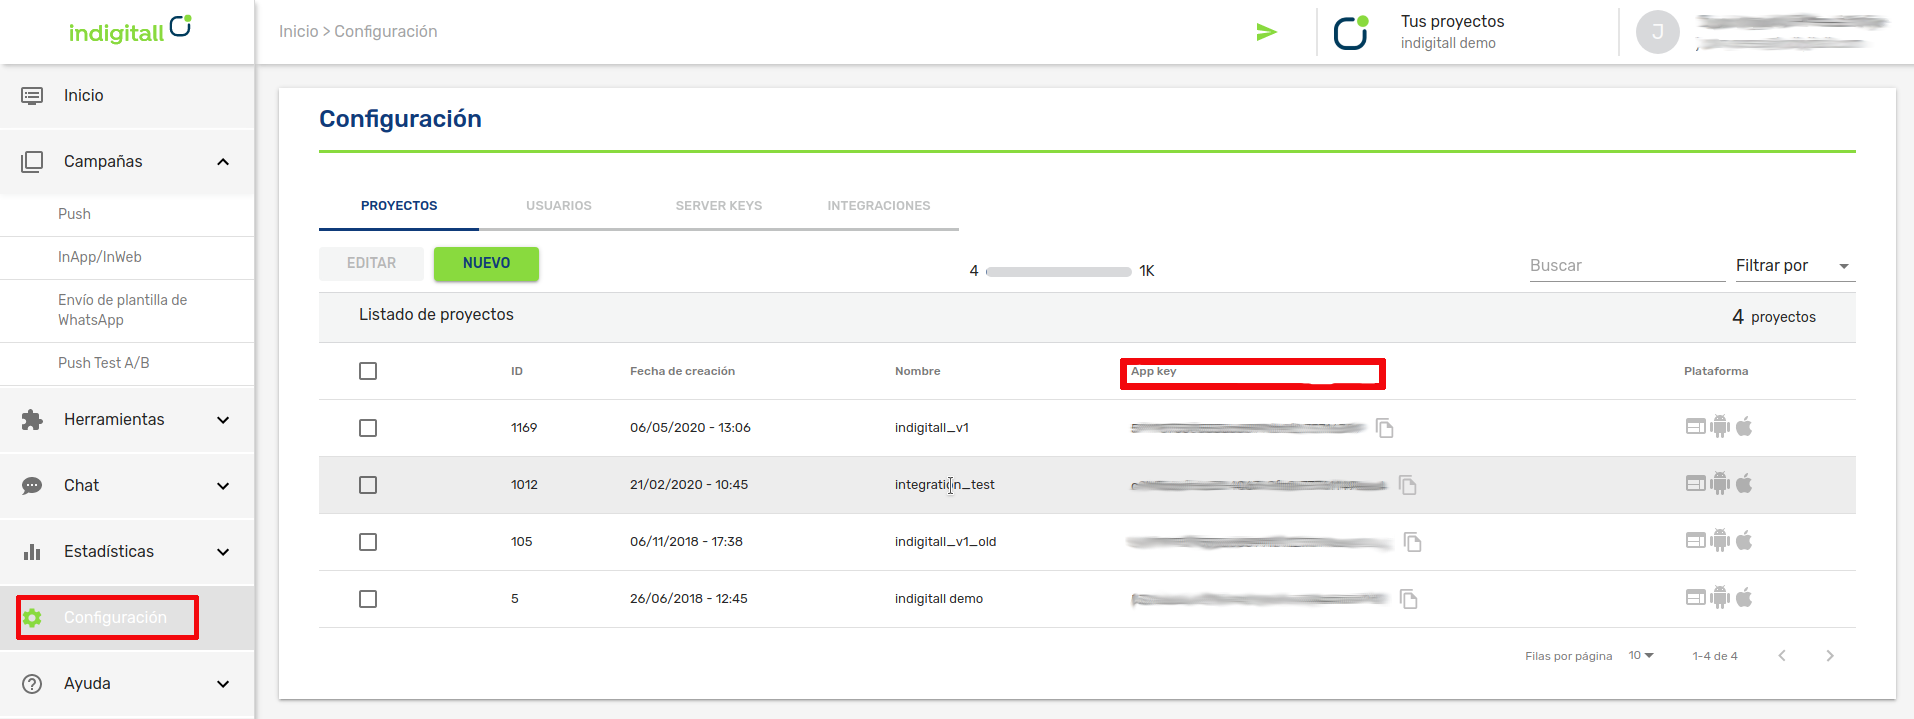
- Necesitarás el App Key del proyecto, que es la clave que usa nuestro sistema para identificarlo, por lo que es única para cada proyecto. Lo puedes encontrar en la consola de administración dentro de la sección Configuración en la pestaña Proyectos. Puedes verlo en la siguiente imagen, y para copiarlo están sencillo cómo hacer click en el icono que hay junto a la clave (App Key)
- Un certificado válido de push para iOS. Aprende como obtener el certificado push desde APNS
- Xcode
- Un dispositivo con iOS para ejecutar la app
Integración
Este artículo muestra el desarrollo mínimo que hay que hacer para comenzar a registrar dispositivos y poder realizar las primeras campañas push.
Añadiendo las dependencias del SDK
El SDK está disponible tanto por CocoaPods como por SPM (Swift Package Manager)
CocoaPods
El SDK está disponible a través de CocoaPods.
CocoaPods es un gestor de dependencias válido para Swift y Objective-C, siendo el más popular en el desarrollo de iOS.
Si aun no lo tienes, instala CocoaPods. Abre tu terminal y ejecuta los siguientes comandos:
$ cd /ROOT/OF/YOUR/PROJECT
$ gem install cocoapods
$ pod init
Swift Package Manager
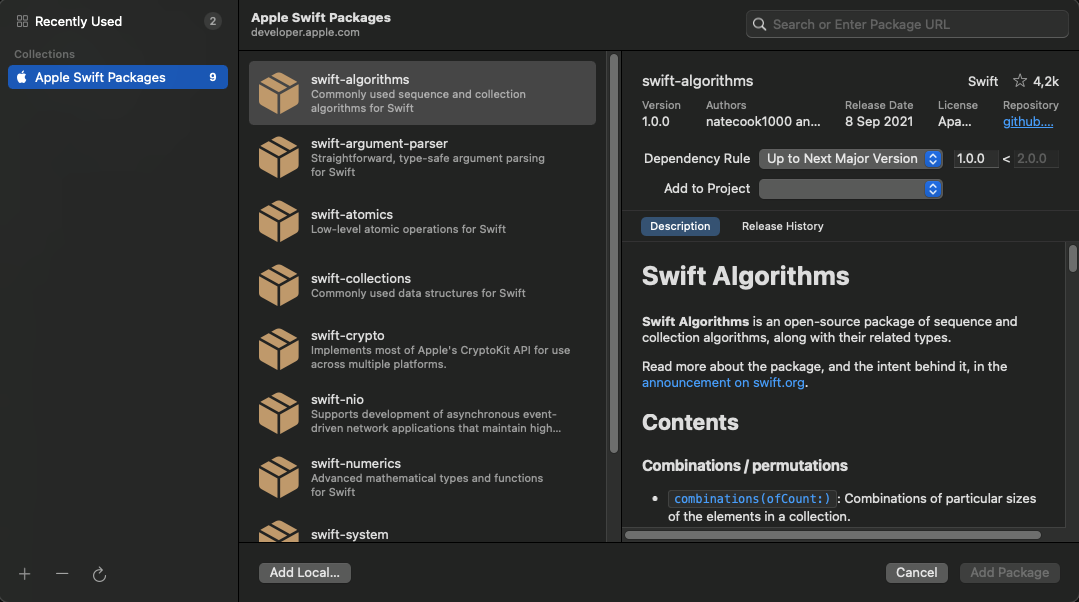
SPM o Swift Package Manager, es una herramienta para distribuir código iOS. De la misma manera qu ehemos explicado con CocoaPods. Pero en este caso, para importar el paquete, tienes que ir a File->Add Pacakages y te mostrará la siguiente pantalla:
Después, vas al buscador de arriba a la derecha, y añades la siguiente url: https://bitbucket.org/indigitallfuente/ios-sdk-pod/src/Indigitall/ como se muestra a continuación
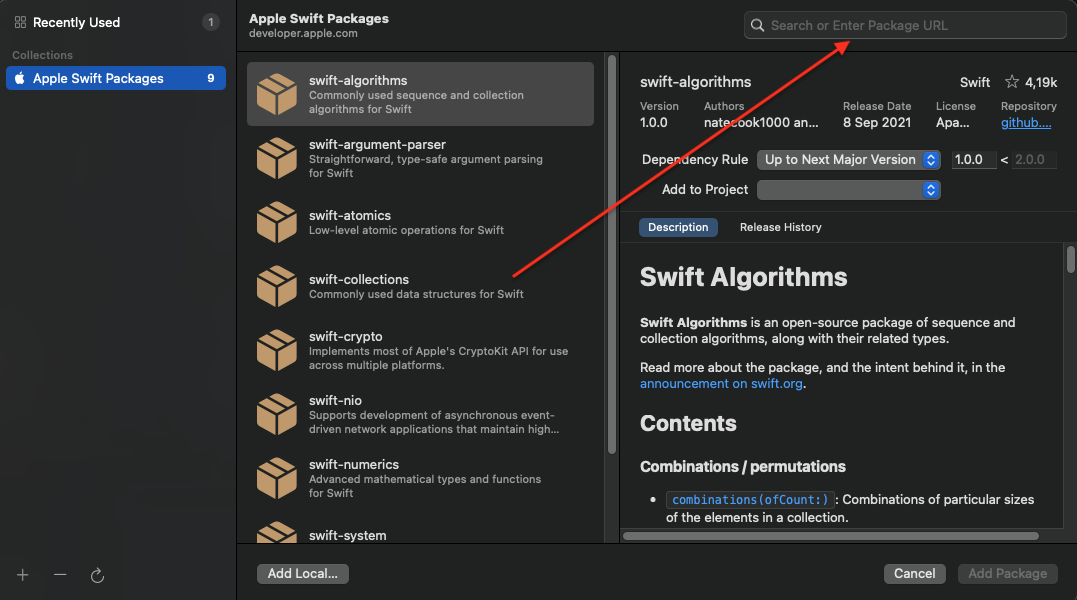
Añades el paquete, y ya puedes seguir con la integración.

Notification Service Extension
Desde la salida de iOS 10, las apps pueden gestionar notificaciones push enriquecidas, es decir, con imágen, gif, vídeo, botones, etc.
Para poder hacer uso de estas funcionalidades, tu app necesita implementar el Notification Service Extension.
- Añade un nuevo Notification Service Extension a tu proyecto (Xcode: Archivo > Nuevo > Target).
- Añade el extension target en tu aplicación.
- Una vez creado hay que fijarse en dos puntos en el target del NSE:
- El Bundle identifier tiene que ser el mismo que el de la app mas el Display name del NSE.
- En el campo deployment info hay que indicar el sistema iOS mínimo al que se quiera impactar, por lo que recomendamos que sea el mismo que el que tengas configurado en la app.
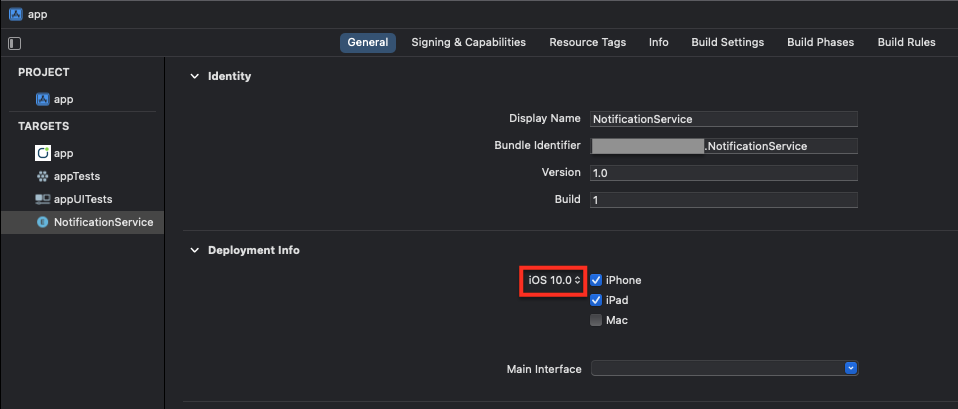
- Hay que tener cuidado en este punto porque Xcode al crear el target, te configura el deployment info en el último sistema iOS disponible. Si no lo configuras correctamente, en los dispositivos por debajo del target indicado no mostrará las notificaciones enriquecidas.
- Se habrá creado el fichero NotificationService dentro de este target. Sobrescribe todo el contenido con el siguiente código:
import Indigitall
class NotificationService: UNNotificationServiceExtension {

    var contentHandler: ((UNNotificationContent) -> Void)?
    var bestAttemptContent: UNMutableNotificationContent?
    var request: UNNotificationRequest?

    override func didReceive(_ request: UNNotificationRequest, withContentHandler contentHandler: @escaping (UNNotificationContent) -> Void) {
        self.contentHandler = contentHandler
        self.request = request
        self.bestAttemptContent = (request.content.mutableCopy() as? UNMutableNotificationContent)

        Indigitall.didReceive(self.request!, withContentHandler: self.contentHandler!)
    }

    override func serviceExtensionTimeWillExpire() {
        if let contentHandler = contentHandler, let bestAttemptContent = bestAttemptContent {
            Indigitall.serviceExtensionTimeWillExpire(bestAttemptContent, withContentHandler: contentHandler)
        }
    }

}
#import <UserNotifications/UserNotifications.h>
#import <Indigitall/Indigitall.h>

API_AVAILABLE(ios(10.0))
//NotificaiontService.h
@interface NotificationService : UNNotificationServiceExtension
@end

//NotificationService.m
@interface NotificationService ()

@property (nonatomic, strong) void (^contentHandler)(UNNotificationContent *contentToDeliver);
@property (nonatomic, strong) UNMutableNotificationContent *bestAttemptContent;
@property (nonatomic, strong) UNNotificationRequest *request;

@end

@implementation NotificationService

- (void)didReceiveNotificationRequest:(UNNotificationRequest *)request withContentHandler:(void (^)(UNNotificationContent * _Nonnull))contentHandler {
    self.contentHandler = contentHandler;
    self.bestAttemptContent = [request.content mutableCopy];
    self.request = request;

    [Indigitall didReceiveNotificationRequest:self.request withContentHandler:self.contentHandler];

}

- (void)serviceExtensionTimeWillExpire {
    if (self.contentHandler != nil && self.bestAttemptContent != nil){
        [Indigitall serviceExtensionTimeWillExpire:self.bestAttemptContent withContentHandler:self.contentHandler];
    }
}

@end
Configuración
Modifica el fichero PodFile de tu proyecto y añade este código:
target '<YourTarget>' do
    pod 'indigitall-ios'
end
target '<YourTargetNotificationExtension>' do
    pod 'indigitall-ios'
endRecuerda: añade los pod correspondientes del SDK dentro de los nombres de los target que tenga tu aplicación.
Actualiza el repositorio de CocoaPod e instala las dependencias desde el terminal:
$ pod repo update
$ pod installAtención: a partir de aquí debes usar .workspace en vez de .xcproject para trabajar en el proyecto.
La principal diferencia es que .xcproject es para un único proyecto y .workspace puede contener varios proyectos.
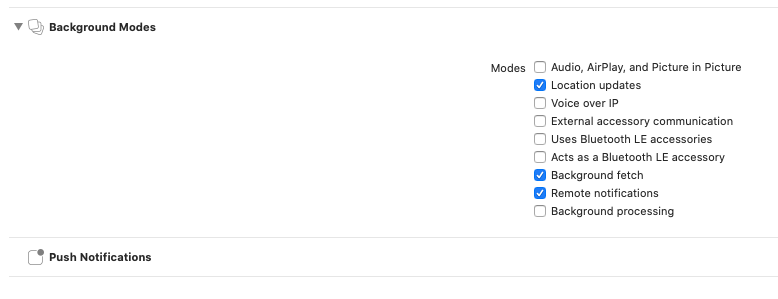
Activa las capabilities:
- Push Notifications en Background Modes
- Location updates
- Background Fetch
- Remote notifications
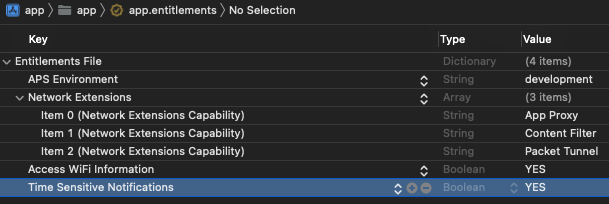
Time Sensitive Entitlement:
Si deseas mandar notificaciones que puedan saltarse el resumen programado del usuario (a partir de iOS 15), debes añadir el siguiente campo en el entitlement de la aplicación:
Implementación en AppDelegate
Puedes verlo en nuestro vídeo tutorial o leer las instrucciones más abajo:
Mofifica el fichero AppDelegate para importar el SDK y sobreescribir los siguientes métodos:
import Indigitall

func application(_ application: UIApplication, didRegisterForRemoteNotificationsWithDeviceToken deviceToken: Data) {
    Indigitall.setDeviceToken(deviceToken)
}

// Foreground
if #available(iOS 10.0, *) {
    UNUserNotificationCenter.current().delegate = self;
};

@available(iOS 10.0, *)
func userNotificationCenter(_ center: UNUserNotificationCenter, willPresent notification: UNNotification, withCompletionHandler completionHandler: @escaping (UNNotificationPresentationOptions) -> Void) {
    completionHandler(Indigitall.willPresentNotification());
}

func userNotificationCenter(_ center: UNUserNotificationCenter, didReceive response: UNNotificationResponse, withCompletionHandler completionHandler: @escaping () -> Void) {
    Indigitall.handle(with: response)
}

//DEPRECATED
func application(_ application: UIApplication, didReceiveRemoteNotification data: [AnyHashable : Any]) {
    Indigitall.handle(withNotification: data, identifier: nil)
}

//@DEPRECATED
func application(_ application: UIApplication, handleActionWithIdentifier identifier: String?, forRemoteNotification userInfo: [AnyHashable : Any], completionHandler: @escaping () -> Void) {
    Indigitall.handle(withNotification: userInfo, identifier: identifier)
}

//@DEPRECATED
func application(_ application: UIApplication, didReceiveRemoteNotification userInfo: [AnyHashable : Any], fetchCompletionHandler completionHandler: @escaping (UIBackgroundFetchResult) -> Void) {
    Indigitall.handle(withNotification: userInfo, identifier: nil)
    completionHandler(.newData)
}

func application(_ application: UIApplication, performFetchWithCompletionHandler completionHandler: @escaping (UIBackgroundFetchResult) -> Void) {
    Indigitall.performFetch(completionHandler: completionHandler)
}
#import <Indigitall/Indigitall.h>
- (void) application:(UIApplication *)application didRegisterForRemoteNotificationsWithDeviceToken:(NSData *)deviceToken{
[Indigitall setDeviceToken:deviceToken];
}
// Foreground
UNUserNotificationCenter.currentNotificationCenter.delegate = self;
- (void) userNotificationCenter:(UNUserNotificationCenter *)center willPresentNotification:(UNNotification *)notification withCompletionHandler:(void (^)(UNNotificationPresentationOptions))completionHandler API_AVAILABLE(ios(10.0)){
completionHandler([Indigitall willPresentNotification]);
}
- (void) userNotificationCenter:(UNUserNotificationCenter *)center didReceiveNotificationResponse:(UNNotificationResponse *)response withCompletionHandler:(void (^)(void))completionHandler{
[Indigitall handleWithResponse:response];
}
//@DEPRECATED
- (void) application:(UIApplication *)application didReceiveRemoteNotification:(nonnull NSDictionary *)userInfo{
[Indigitall handleWithNotification:userInfo identifier:nil];
}
//@DEPRECATED
- (void) application:(UIApplication *)application didReceiveRemoteNotification:(nonnull NSDictionary *)userInfo fetchCompletionHandler:(nonnull void (^)(UIBackgroundFetchResult))completionHandler{
[Indigitall handleWithNotification:userInfo identifier:nil];
}
//@DEPRECATED
- (void) application:(UIApplication *)application handleActionWithIdentifier:(nullable NSString *)identifier forRemoteNotification:(nonnull NSDictionary *)userInfo completionHandler:(nonnull void (^)(void))completionHandler{
[Indigitall handleWithNotification:userInfo identifier:identifier];
}
//Setup Perform Fetch in background
- (void) application:(UIApplication *)application performFetchWithCompletionHandler:(nonnull void (^)(UIBackgroundFetchResult))completionHandler{
[Indigitall performFetchWithCompletionHandler:completionHandler];
}Inicializar el SDK
Añade el siguiente código al AppDelegate y recuerda cambiar YOUR-APP-KEY por el App Key que puedes encontrar en la consola de indigitall
func application(_ application: UIApplication, didFinishLaunchingWithOptions launchOptions: [UIApplicationLaunchOptionsKey: Any]?) -> Bool {
    Indigitall.initialize(withAppKey: "<YOUR-APP-KEY>")
    return true
}
#import <Indigitall/Indigitall.h>
- (BOOL)application:(UIApplication *)application didFinishLaunchingWithOptions:(NSDictionary *)launchOptions {
// Override point for customization after application launch.
[Indigitall initializeWithAppKey:@"<YOUR-APP-KEY>"];
return YES;
}Validar la integración
Para comprobar que la integración se ha realizado correctamente realiza lo siguiente:
- Desde xCode, ves al log y busca la llamada PUT /device conteniendo los parámetros appKey, deviceId y pushToken y que devuelva HTTP 200.
- Envia una notificación desde la consola de indigitall. Es posible que en la consola el contador de dispositivos aparezca a 0. No te preocupes, puede tardar unos minutos en actualizarse, pero no hace falta que esperes, la push debería llegar igualmente.